Lasso Selection and Point Cloud Alignment
Introduction :
This blog describes a mechanism to select a point in the point cloud, select points using lasso selection and alignment of two point clouds using manual registration and global registration.
Applications:
- 3D Scanners
- TM (Digital terrain model) Laser Scanner
- Airborne Laser Scanning
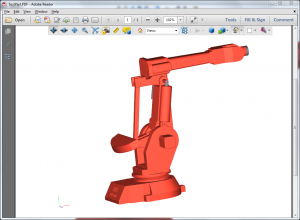
1. Point Selection and Lasso Selection :
We have implemented Ray casting algorithm to select the point on left mouse button click.
It fires the Ray from near plane to far plane and it finds the nearest point to the Ray within a certain tolerance. Once we get a set of points nearest to the ray, we pick the point closest to the camera.
Performance analysis:
Total number of points: 5,79,158
Time : 0.102 seconds
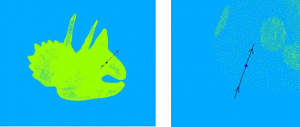
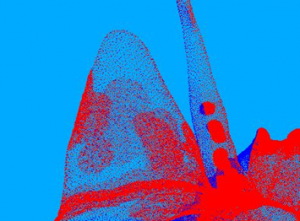
Lasso Selection :
Lasso selection allows the user to select points from point cloud by drawing any random shape on the screen.
Lasso selection is also known as Free Selection tool. The user can select a subset of points from point cloud by drawing a freehand sketch. The Lasso tool is used for selections where there is no pre-defined shape.
You can see below image
Lasso Selection
Algorithm:
The application projects all the points onto a 3D plane and checks if the projected points lie inside or outside the lasso shape.
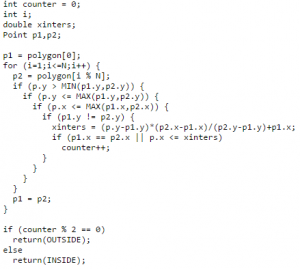
This code is helpful for finding the points inside lasso shape.Once these points are selected, the user can perform various operations such as delete, move, highlight, etc. Usually, when dealing with Point clouds Lasso selection is helpful in deleting unwanted points.
2. Point cloud alignment :
We have implemented an algorithm to align the two-point clouds based on three points selection. But In the case of three points alignment, two points clouds are aligned but not 100%. So we have used PCL ICP to refine the output cloud.
Steps for Alignment two point cloud :
1. Load two point clouds in two viewers source(left) and target(right) using drag-drop
2. Select three points in both(source and target) viewers
3. Click on “Manual Alignment” toolbar to align both point clouds based on selected three points. It will quickly align both the clouds and render the merged cloud (target and source) in output viewer (bottom)
Example 2: Three-Point Alignment
The above process is known as manual registration. Using manual registration user can quickly align the two point clouds. This helps the user to visualize the point cloud properly however it is not good enough if you want to proceed with surface re-generation, hole filling, etc applications. The points are closely aligned but not as accurate as required as shown in image Example2 above.
In order to align the points as closely as possible, we use a technique called as Global Registration. We implemented “Global Registration” using PCL ICP library.
These are few parameters user have to set for “Global Registration”.
Max Iteration: Number of iterations for movement of each point to its closest point.
Max Correspondence Distance: Search out point which lies between 0.0 to maximum distance.
RANSAC Outlier Rejection Threshold: If the distance between two points is less than 0.06 then neglect the distance and overlap to each other.
After global registration the point cloud looks like the following:
Global Registration (ICP)
The time taken during global registration can vary significantly depending upon the point cloud size, the ICP parameters, etc.
Following are few results from time comparison studies:
Number Of Point In Cloud :
Source Cloud : 3,19,627
Target Cloud : 3,04,416
Performance analysis:
| Number of Iterations | Time duration for Global Registration (In Seconds) |
| 10 | 23 |
| 25 | 51 |
| 40 | 83 |
| 50 | 101 |
| 75 | 148 |
| 100 | 199 |
References:
Author: Amit M
Contact us:
info@prototechsolutions.com
ProtoTech Solutions and Services Pvt. Ltd.