13 Easy steps for a 3D Developer to create a WPF sandbox using HOOPS (HPS) SDK
HOOPS Visualize (HPS) comes with a demo sandbox application which you can refer to, to try HOOPS APIs. These sandbox applications provided by HOOPS already come with default functionality like import or export other CAD format files, perform operations like orbit, pan etc on models, segment and model tree etc. HPS sandbox also has 4 buttons on which you can try and run different APIs of HOOPS.
Steps below will help you in creating sandbox application from scratch using HPS and with MVC architecture:
1. Create a new WPF App (.NET Framework) project.
2. As MVC architecture is followed to create Model, View and Controller folder in the project hierarchy (as shown below).
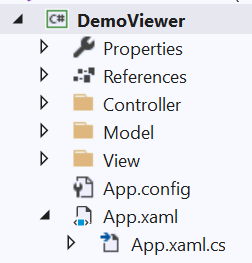
Fig1 : Project Hierarchy
3. Move the ‘MainWindow.xaml’ file in the ‘View’ folder, you will be able to build the project but it will fail to run after doing this step. To fix this problem,
Open ‘App.xaml’ file and replace StartupUri=”MainWindow.xaml” with StartupUri=”View/MainWindow.xaml”
You should also open the ‘MainWindow.xaml’ file and replace x:Class=”DemoViewer.MainWindow” with x:Class=”DemoViewer.View.MainWindow”. Same goes with the ‘MainWindow.xaml.cs’ file replacing ‘namespace DemoViewer’ with ‘namespace DemoViewer.View’
4. Now, to run the HPS API you need to first add the ‘HOOPSLicenses.cs’ file in your project ‘Model’ folder. You can refer to the ‘HOOPSLicenses.cs’ file present in the HPS sandbox project. Also add the license in the file.
5. To make the canvas control of your application you can refer to the file ‘SprocketsWPFControl.cs’ of HPS sandbox project. You can create a new file ‘DemoCanvasControl.cs’ in the ‘Model’ folder of your project. In this file create classes: ‘MyErrorHandler’, ‘MyWarningHandler’, ‘MyFileDropEventArgs’, and ‘SprocketsWPFControl’.
There are two copies of class ‘SprocketsWPFControl’ in the if-else block. You can use a copy of the class present in the ‘USE_D3D_IMAGE_CANVAS’ block. You can also rename the classes as per your need (if you have copied the ‘SprocketsWPFControl’ class from HPS sandbox project then you have to rename the class to ‘DemoCanvasControl’ (or any other name that you want to give)).
6. Add two more files ‘ModelBase.cs’ and ‘View.cs’ in the ‘Model’ folder of your project. Add class ‘ModelBase’ in ‘ModelBase.cs’ file, this will be a singleton class and add class ‘Viewer’ in ‘View.cs’ file will be a normal class.
7. The class ‘ModelBase’ will be a base class of our application in which you will create static variables for HPS.World, DemoCanvasControl, HPS.Model, HPS.View _view, ErrorHandler and WarningHandler _warningHandler. You can also create public property for the same.
8. Now create four methods ‘CreateProject’, ‘CreateModel’, ‘InitializeDemoCanvasControl’ and ‘SetupDefaultScene’ in class ‘ModelBase’.
a. CreateModel: Will create a new model for your project. You will initialize HPS.Model in this project (refer below code).
| private void CreateModel() { model = HPS.Factory.CreateModel(“Model”); } |
b. InitializeDemoCanvasControl: This method will initialize the canvas control for your application (refer below code).
| public void InitializeDemoCanvasControl() { // Create and initialize Hoops World hpsWorld = new HPS.World(HOOPS_LICENSE.KEY); errorHandler = new ErrorHandler(); warningHandler = new WarningHandler(); // Create and attach HPS canvas control canvasCtrl = new DemoCanvasControl(HPS.Window.Driver.Default3D, “main“); } |
c. SetupDefaultScene: In this method you can set all the default scene settings like Attach a model, set default operators and subscribe _warningHandler to handle warnings (refer below code).
| private void SetupDefaultScene() { DemoCanvasControl ctrl = canvasCtrl;if (ctrl == null) return; // Attach a model view = ctrl.Canvas.GetFrontView(); view.AttachModel(model); // Set default operators view.GetOperatorControl() .Push(new HPS.OrbitOperator(HPS.MouseButtons.ButtonLeft())); // Subscribe event to the respective event handler HPS.Database.GetEventDispatcher().Subscribe(warningHandler, HPS.Object.ClassID<HPS.WarningEvent>()); } |
d. CreateProject: This method will call ‘CreateModel’ and ‘SetupDefaultScene’ methods and also update the canvas (refer below code).
| public void CreateProject(string name) { CreateModel(); SetupDefaultScene(); view.FitWorld();view.Update(); } |
9. In file ‘View.cs’ create a class ‘Viewer’ and add below code.
| public Viewer() { ModelBase.GetInstance().InitializeDemoCanvasControl(); } public void CreateProject(string Name = “NewViewer”) { ModelBase.GetInstance().CreateProject(Name); } |
10. Now you need to link your HPS view with your main window. For this follow below steps:
a. Add a border inside a grid in file ‘MainWindow.xaml’ (refer below code).
| <DockPanel x:Name=“_cPanel” AllowDrop=“True”> <Border x:Name=“_cBorder” Margin=“0,0,0,0” BorderThickness=“0”/> </DockPanel> |
b. Now create a controller class ‘MainWindowController’ for your main window in the ‘Controller’ folder of your project.
c. Class ‘MainWindowController’ is a singleton class, and add the ‘Viewer’ class variable and below methods in this class.
| private MainWindowController() { _viewer = new Viewer(); LinkViewerToMainWin(_viewer); } // Link HPS Canvas to the area in WPF Window private void LinkViewerToMainWin(Viewer viewer) { View.MainWindow window = (View.MainWindow)Application.Current.MainWindow; window.SetDemoCanvasControlToMainWin(ModelBase.GetInstance().canvasCtrl); } |
d. Also add below code in ‘MainWindow.xaml.cs’ file
| public MainWindow() { InitializeComponent(); _mainwindowController = MainWindowController.GetInstance(); DataContext = _mainwindowController; NewCommand.Execute(this); } public void SetDemoCanvasControlToMainWin(CanvasControl ctrl) { _cBorder.Child = ctrl; } |
11. This blog also covers the process of creating a new command using ‘ICommand’. Create a new file ‘NewCommand.cs’ in the ‘Controller’ folder which will have a class ‘NewCommand’ which inherits an interface ‘ICommand’ (refer below code).
| public event EventHandler CanExecuteChanged; private Viewer _Viewer; public NewCommand(Viewer viewer) { _Viewer = viewer; } public bool CanExecute(object parameter) { return true; } public void Execute(object parameter) { _Viewer.CreateProject(); } |
a. In the file ‘MainWindow.xaml.cs’ add below code to execute a command.
| private ICommand _newCommand; public ICommand NewCommand { get { if (_newCommand == null) _newCommand = newNewCommand(MainWindowController.GetInstance()._viewer); return _newCommand; } } |
12. To add geometry in view you can create a simple cube by using HPS shell API (refer the doc https://docs.techsoft3d.com/hps/latest/build/prog_guide/0201_shells.html) and call it after setting the default scene in function ‘SetupDefaultScene’.
13. After making the above changes, build the project and add the HPS dlls mentioned in the “A Quickstart guide for 3D Application Developers to integrating HPS (HOOPS 3D Graphics SDK from Tech Soft 3D)” blog. Now run the application, it will show you HPS view attached with your application WPF windows (refer below image).
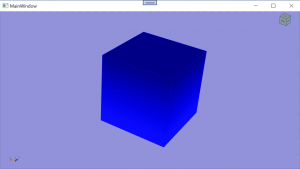
Fig2 : Output Window
So, in this blog you have learned how to get started with integrating HPS to your application and use it to create your own viewer from scratch using WPF. You can use this as a benchmark and further work on adding menus and toolbar for adding more functionality to your application or set different operators on button click, or add file import button which will import different CAD file formats in your application using Hoops Exchange.
Contact us:
info@prototechsolutions.com
ProtoTech Solutions and Services Pvt. Ltd.