Design and Implement Lasso (Polygonal) Selection Tool for Point Cloud in OpenGL
Design and Implement Lasso (Polygonal) Selection Tool for Point Cloud in OpenGL
Introduction
This blog describes a method to implement Lasso selection tool for your MFC & OpenGL based application.
A point cloud is basically a set of vertices and a very typical source of this data is a 3D scanner. Before I proceed to explain the design, let me state a few assumptions which are as below.
1. You have an MFC application with a view that can render vertices using OpenGL Graphics.
2. Your application has the ability to draw a polygon on the view using mouse events.
Ready? Here’s how we do it.
Lasso Selection Logic
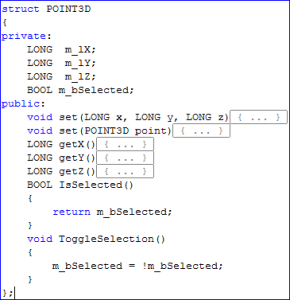
1. Create a new structure to store the coordinates of the point as well as its’ selection status.
2. All the points are stored in the vector of POINT3D objects as shown below.
e.g std::vector<POINT3D>m_points;
3. As you may know, OpenGL Graphics is an immediate mode graphics system, so we keep on rendering these points in a loop, on the screen (see image below). To select a point or set of points we can change the color of that particular point.
Image 1: Rendered points
4. It’s a 3 step process to select points.
For all the points ->
I) Convert the point in 3D (model view space) to screen coordinates.
II) Check if that point is inside the polygon.
III) Highlight the point if it’s inside.
Now let’s see each step in detail.
I) Convert the point in 3D to screen coordinates
All the points are drawn in 3D space, but the polygon is drawn in the screen space. That’s why we need to establish a relationship between points in the cloud and the selected polygon. In order to test if the point is inside the polygon, both have to be in the same plane.
To achieve that, the solution is to project the point onto the screen where we are drawing the polygon.
Image 2: Polygon drawn
Here’s the code snippet to project point on screen.
double modelView[16];
double projection[16];
double winX = 0,winY = 0,winZ = 0;//Coordinates of screen point returned after projection.
glGetDoublev(GL_MODELVIEW_MATRIX, modelView);
glGetDoublev(GL_PROJECTION_MATRIX, projection);
GLint viewport[4];
glGetIntegerv (GL_VIEWPORT, viewport);
std::vector<POINT3D>::iterator itPos = m_points.begin();
for(; itPos <m_points.end(); ++itPos)
{
POINT3D vertex;
vertex.set(*itPos);
gluProject(vertex.getX(),
vertex.getY(),
vertex.getZ(),
modelView,
projection,
viewport,
&winX,
&winY,
&winZ);
}
II) Check if that point is inside the polygon.
In this step, we check for each projected point if it lies within the polygon.
There are many algorithms available on the internet to test this. Raycasting algorithm and Winding Number algorithm are some of them. Here’s the link where you can find more information on these algorithms.
http://en.wikipedia.org/wiki/Point_in_polygon
http://erich.realtimerendering.com/ptinpoly/
III) Change the color if the point is inside the polygon.
As you can see above in the POINT3D structure, I have a variable for status. I make it inverse of itself, so that if it’s already selected it will deselect and vice versa.
m_bSelected = !m_bSelected
Rest is done by OnPaint() function that continuously draws the points in OpenGL. If it’s selected, it will draw the point in vertex color and if not, then it will draw in selection color.
glClearColor(0, 0, 0, 0);
(GL_COLOR_BUFFER_BIT | GL_DEPTH_BUFFER_BIT);
glPointSize(10);
glEnable(GL_POINT_SMOOTH);
glBegin(GL_POINTS);
for(int i = 0; i < NPOINTS; i++)
{
if(m_points.at(i).IsSelected())
glColor3f(0.2f, 0.8f, 0.2f);//Green Color
else
glColor3f(0.8f, 0.2f, 0.8f);//Pink Color
glVertex3d(m_points.at(i).getX(),
m_points.at(i).getY(),
m_points.at(i).getZ());
}
glEnd();
Here’s how selected points look.
Image 3: Look of selected points
Author: Mohan S.
Contact us:
info@prototechsolutions.com
ProtoTech Solutions


