Adding Custom GUI to Autodesk Inventor
This is an era of specialization which means there is a specialized software to design everything. There is a design software that is meant to only design a screw and on the other hand there is one for rockets. Many design software companies leverage existing software platforms (viz. Inventor, Solidworks, Creo etc.) and customize them to allow designers to design specific products. Since each product has it’s own parameters, each of these customization requires very specific GUI widgets (dialog boxes, panes, menus and buttons) which can help the designer perform specific actions which are the part of the design workflow.
Inventor has provided capability to customize the UI through programming interfaces commonly known as APIs. These UI features allow the CAD customization while maintaining the look and feel and hence provides the designer a seamless experience.
Today, I will provide you a very quick overview from ProtoTech Solutions, on how to create a custom dialog box which can be added in pane. This dialog box can be used to draw specific geometry elements in Inventor.
Below are the steps to create dialog and attach it to pane.
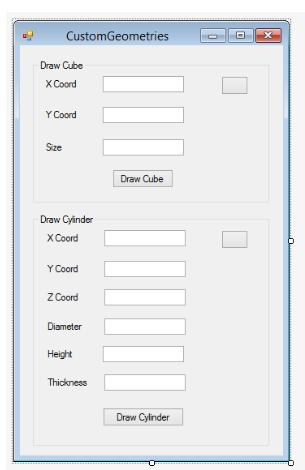
1. Create a new form which would contain .cs and designer and add controls to it as shown in image below:
Name of my form is : CustomGeometries
2. To add dialog to pane, we need to access the Interface manager of Inventor.
To get Interface manager and add dialog to pane we need Inventor.Application.
Below is the code snippet :
public CustomGeometries(Inventor.Application thisapp)
{
InitializeComponent();
buttonCylinderColor.ForeColor = System.Drawing.Color.FromArgb(255,255,255);
if (indexer == 0)
{
indexer++;
UserInterfaceManager mngr = thisapp.UserInterfaceManager;
DockableWindows docWindows = mngr.DockableWindows;
customWindow = thisapp.UserInterfaceManager.DockableWindows.Add(“Draw Custom Geometries”, “Draw Custom Geometries”, “Draw Custom Geometries”);
customWindow.AddChild(this.Handle);
customWindow.Caption = “Draw Custom Geometries”;
customWindow.Visible = true;
customWindow.DockingState = DockingStateEnum.kDockLeft;
customWindow.Visible = true;
this.Visible = true;
customWindow.ShowTitleBar = true;
}
ThisApplication = thisapp;
}
3. To Draw cylinder with or without thickness, we need the location of cube i.e. start point from where the sketch is to be started. And also the diameter,
height of cylinder and if you want to specify the thickness. We also have option to choose the color of cube to be drawn.
Here is the code snippet to draw cylinder with or without thickness on button click:
private void buttonDrawCylinder_Click(object sender, EventArgs e)
{
PartDocument oPartDoc = default(PartDocument);
oPartDoc = (PartDocument)ThisApplication.Documents.Add(DocumentTypeEnum.kPartDocumentObject, ThisApplication.FileManager.GetTemplateFile(DocumentTypeEnum.kPartDocumentObject));
PartComponentDefinition oCompDef = default(PartComponentDefinition);
oCompDef = oPartDoc.ComponentDefinition;
double xcord = double.Parse(cyX.Text);
double ycord = double.Parse(cyy.Text);
double zcord = double.Parse(cyZ.Text);
double size = double.Parse(cyDiameter.Text);
double Height = double.Parse(cyHeight.Text);
double thick = 0.0;
double.TryParse(cythck.Text, out thick);
TransientBRep tBrep = ThisApplication.TransientBRep;
Inventor.Point toolBottomPoint = ThisApplication.TransientGeometry.CreatePoint(xcord, ycord, zcord);
Inventor.Point toolTopPoint = ThisApplication.TransientGeometry.CreatePoint(xcord, ycord + Height, zcord);
SurfaceBody cylinderBody = ThisApplication.TransientBRep.CreateSolidCylinderCone(toolBottomPoint, toolTopPoint, size, size, size);
if (thick > 0.0)
{
SurfaceBody toolBody = ThisApplication.TransientBRep.CreateSolidCylinderCone(toolBottomPoint, toolTopPoint, (size – thick), (size – thick), (size – thick));
tBrep.DoBoolean(cylinderBody, toolBody, BooleanTypeEnum.kBooleanTypeDifference);
}
oCompDef.Features.NonParametricBaseFeatures.Add(cylinderBody);
RenderStyle customStyle = default(RenderStyle);
customStyle = oPartDoc.RenderStyles.Add(“NewCustomStyle”);
customStyle.SetDiffuseColor(red, green, blue);
for (int index = 1; index <= oPartDoc.ComponentDefinition.Features.Count; index++)
{
PartFeature oFeature = oPartDoc.ComponentDefinition.Features[index];
oFeature.SetRenderStyle(StyleSourceTypeEnum.kOverrideRenderStyle, customStyle);
}
oPartDoc.Update();
ThisApplication.ActiveView.Fit();
oPartDoc.Update();
}
4. How to change colors of Cylinder:
Note: First user need to select color to be applied to Cylinder.
private void buttonCylinderColor_Click(object sender, EventArgs e)
{
System.Windows.Forms.ColorDialog colorDialog = new System.Windows.Forms.ColorDialog();
DialogResult result = colorDialog.ShowDialog();
if (result == DialogResult.OK)
{
buttonCylinderColor.BackColor = colorDialog.Color;
red = colorDialog.Color.R;
green = colorDialog.Color.G;
blue = colorDialog.Color.B;
}
}
You can add same for drawing ‘Cube’ as well.
Similarly we can customize dialog’s to any extent and achieve expected output.
That’s it. Here are few snapshots of output.
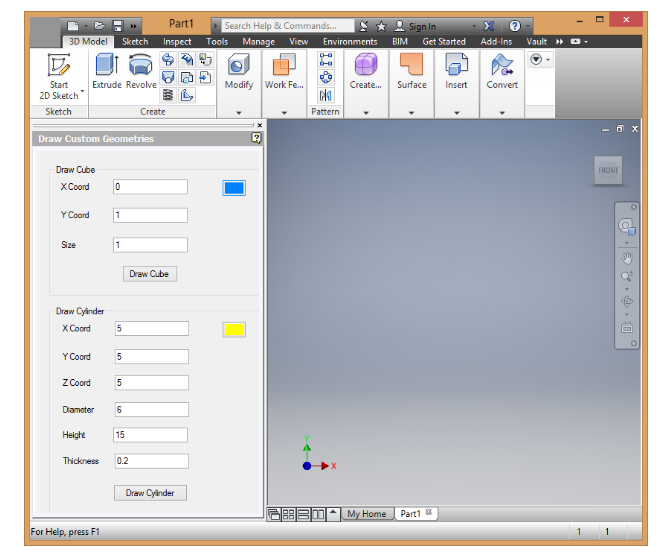
(Fig b. Custom Dialog box added to pane in Inventor)
Show/Hide Dialog boxes:
As these custom dialog boxes are added to standard pane of Inventor, user can show / hide the dialog directly from tab menu.
View -> User Interface -> Draw Custom Geometries
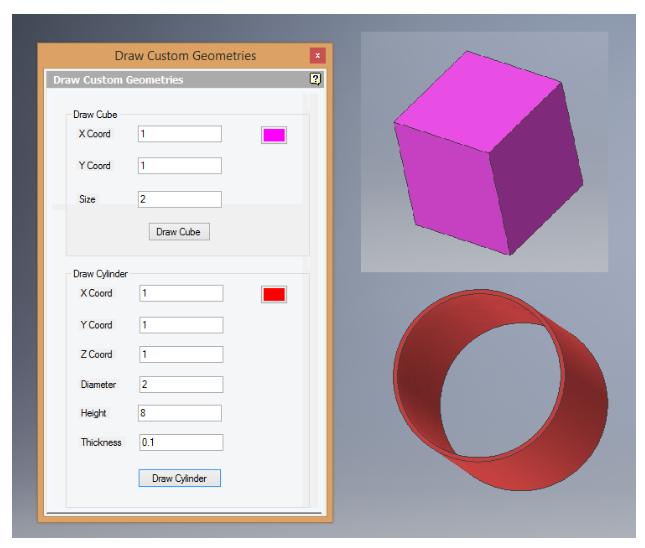
(Fig c. Custom Dialog box with input values in edit boxes and graphical output)
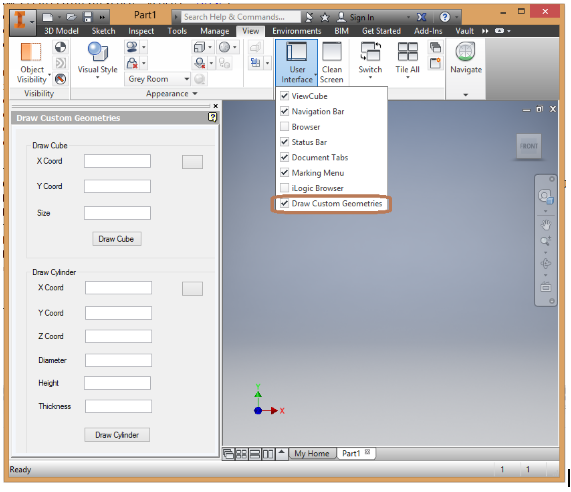
(Fig d. Option to show hide dialog box)
Advantages :
- Design UI for plugin which matches with the style of Inventor’s standard UI.
- Using such UI user can create his own options for drawing geometries, settings panel or color panel etc.
We at ProtoTech Solutions have lot of experience of working with Inventor environment and have in depth understanding of it’s APIs. We also work very closely with Autodesk’s Inventor experts as we are ADN partners. Some of the exciting custom design software that are around are for designing pressure vessels, large cranes, piping plants etc. We are always excited to work on one of these. Feel free to contact us if you need a customization on Inventor (or other design platforms)
Author: Rahul K.
Contact us:
info@prototechsolutions.com
ProtoTech Solutions and Services Pvt. Ltd.


